New Projects in Python
Here is what I’ve determined to be a quick start of best practices when starting a new Python project. Why sure, this is opinionated, but who isn’t, right?
As an example, the project I’m creating is to help me learn something new… like a new Python library. However, I think much of what I’ve got to say works for any project prior to committing it to Git.
This essay is in two parts … getting your computer ready to hack (which should only need to be done once), and what you need to do for each new project.
New Computer
A new computer system needs a more modern version of Python (I’ll assume), and most will want to download version 3. Let me give you a couple of alternative ways to install that may be quicker for certain operating systems…
Mac: If you are on a Mac, you may want to use Homebrew by first starting the Terminal program, and typing:
brew install python3
Linux: On Linux, you may find it easier/quicker to start the Terminal program, and run the following to install Python:
sudo apt install python3-pip3
Windows: On Windows, you could follow the instructions on the Python site, but if you install version 3.6 with the installer, it should just work. The length of that document is a testament for how often it actually works.
Install Pipenv
Next, you will want to install a small, subset of global tools, including pipenv. Much of this essay revolves around this project, so let me try to explain it.
Just about every project you make will use libraries and tools that others have built…you are really standing on the shoulders of others. The problem is that you might be like me, someone that tries out some machine learning algorithms right after building a web app game for mobile phones. My Python environment quickly becomes cluttered with libraries and projects. This really becomes a problem when some of those libraries conflict.
The solution is to create a virtual environment for every project. Sure, you might have the same library installed multiple times for more than one project, but loss of a little disk space is little compared to not needing to troubleshoot issues between dependencies.
Let’s install pipenv…
Windows: Open the PowerShell program, and enter the following:
py -m pip install pipenv
Linux: On Linux (this usually works with Macs too), start the Terminal program and run:
sudo pip3 install pipenv
The sudo command allows you to run a command as the system
administrator, and when it asks for a password, that is just your
password.
Mac: If you are using Homebrew on your Mac, run:
brew install pipenv
This pipenv project may be the only Python module libraries we install globally, as the rest we will install for individual projects.
New Project
A new project begins in a new directory…er, folder. Create that any way you want, but since you’re already in the Terminal, try:
mkdir -p ~/workspace/project-xp
Why xp? Well, that stands for experience points in my favorite game, and it seems appropriate when I am learning something.
Now, go into that directory using the terminal’s command:
cd ~/workspace/project-xp
Installing Libraries
Now that we are running a virtual environment, let’s set up our new
project to install some module libraries we will need. Let’s
suppose I want to play around with the OpenCV project. I’ll need
both numpy and cv2, so I type:
pipenv --three install numpy opencv-python
Note regarding OpenCV: I’m using numpy and opencv as examples,
however, if you want to install OpenCV, you may need to install
some non-Python, low-level support libraries for your operating
system. For Linux, you may have to do the following before the
pipenv install command listed above, works:
sudo apt install libcv-dev
Oh, and why –three? That specifies we want to use version 3 of Python. However, since that should be the default, it should be optional.
Installing Flake
Check for obvious errors and issues in Python with Flake8. First install it with:
pipenv install flake8
Second, if I have a Python code file, num-playground.py, that
contains nothing but the following line:
import numpy
Running flake8 on the project gives me a warning:
$ flake8 num-playground.py
num-playground.py:1:1: F401 'numpy' imported but unused
Fair enough, since my code file is almost empty.
I suggest getting into the habit of running flake8 (or other Python
linting program) after every code change.
Installing bpython
When investigating new libraries, I like the interrogation system,
bpython:
pipenv install bpython
Playing Around with bpython and your project
Now that everything is in order, let’s play. The bpython program
allows you to play around with your module libraries.
Whenever you enter your project directory, you need to
enter that project’s virtual environment by running:
pipenv shell
Now that you are inside this new world, run the bpython program:
bpython
At this prompt, you can start typing Python statements and code.
For instance, when I start to import the numpy project and type:
import nu, bpython shows me all libraries that I could import that
start with nu:

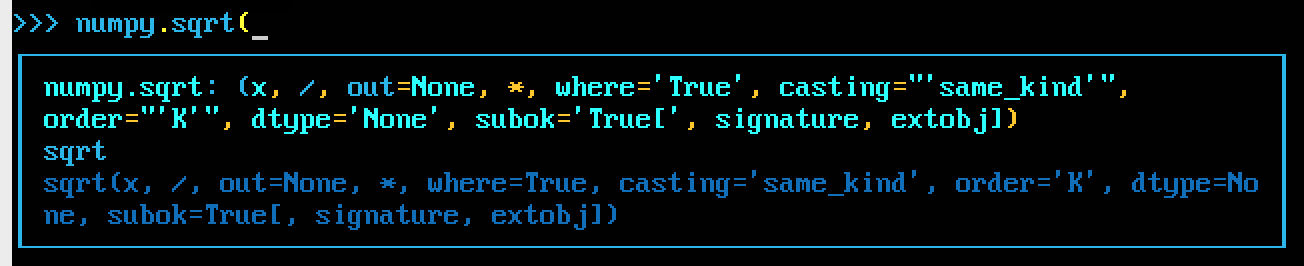
This works in many situations. Is there a square root function in numpy? We can probably find it quicker with bpython than searching with Google:

What parameters do you think the sqrt function takes? As soon as
you type the open parenthesis, bpython tells you:
Summary
Once you have Python and pipenv installed on your system, each new project follows these steps, all entered into the Terminal or PowerShell program:
- mkdir <some-project>
- cd <some-project>
- pipenv install –three <some-library>
- pipenv shell
- bpython
I hope this updated, quick, getting started with a new Python project has been helpful.


